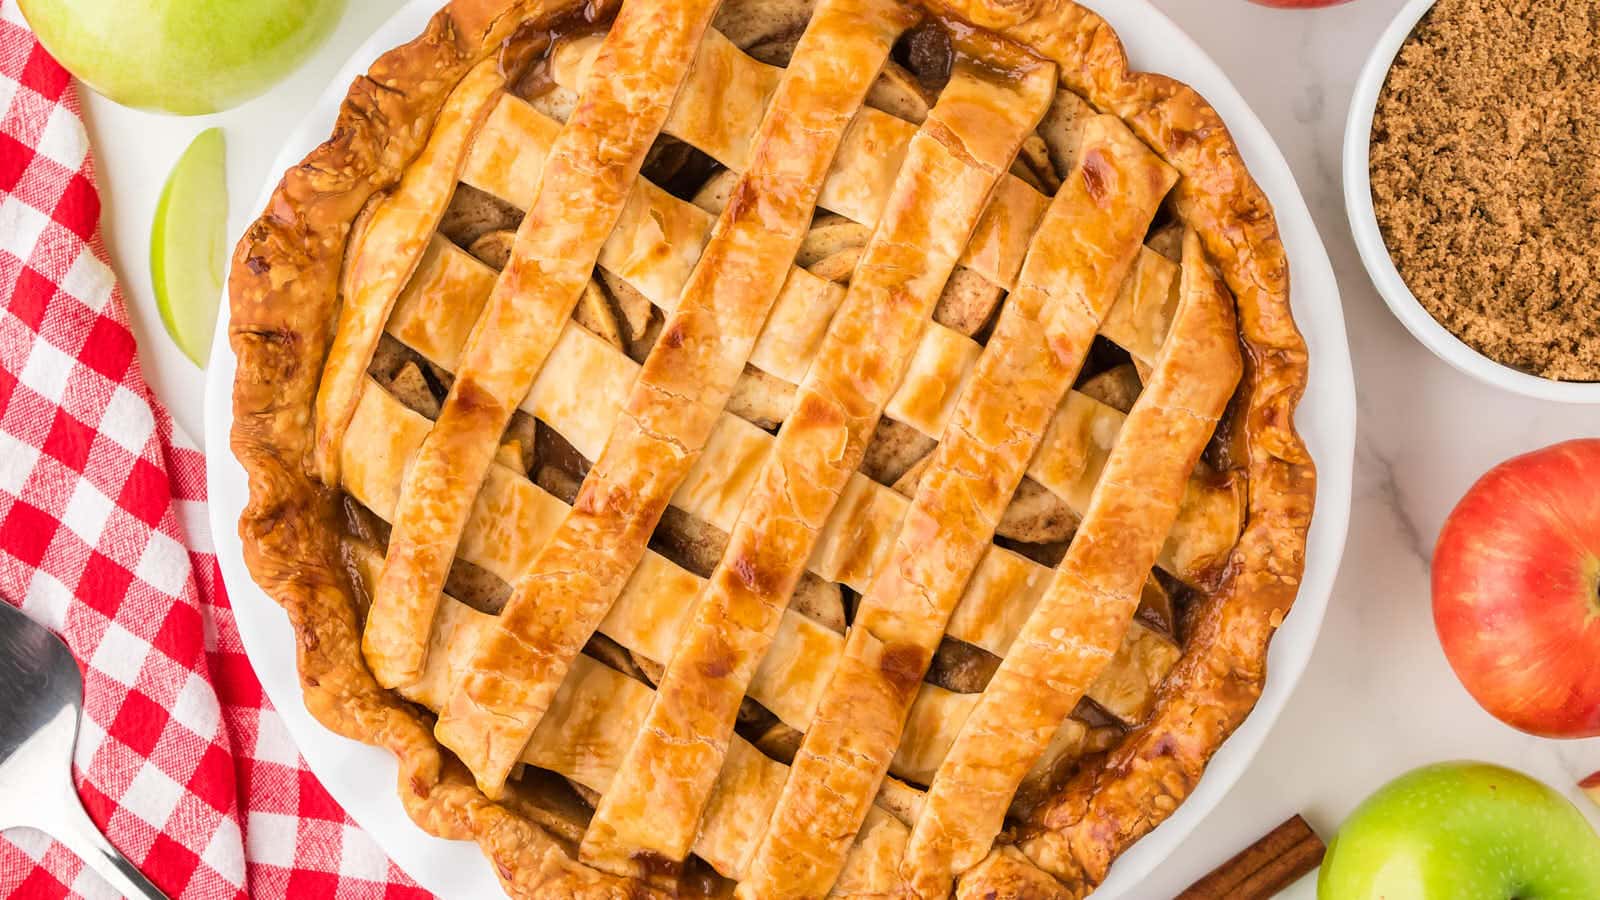
Apple Pie

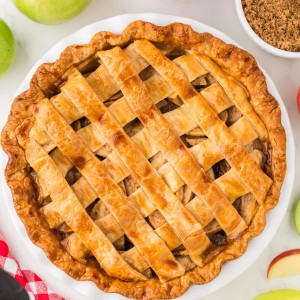

Apple Pie with its flaky golden crust and tender spiced apples creates those perfect fall moments when your kitchen smells like pure comfort and everyone gathers around the table.
The combination of tart Granny Smith and sweet Honey Crisp apples gives you the perfect balance of flavors that won’t turn to mush, while warm cinnamon and just a hint of cloves make this pie taste exactly like autumn should.
If you’re planning a holiday menu, you’ll also want to try my Pumpkin Cheesecake, a rich and creamy twist that’s just as festive as classic Apple Pie.
My family has learned to hover around the kitchen during those final 30 minutes of baking because the smell is absolutely irresistible, and someone always asks if we can skip dinner and go straight to dessert. And then I need to remind them that that, the pie needs to cool first.
Apple Pie Recipe Highlights
- Two apple varieties for perfect texture and flavor balance
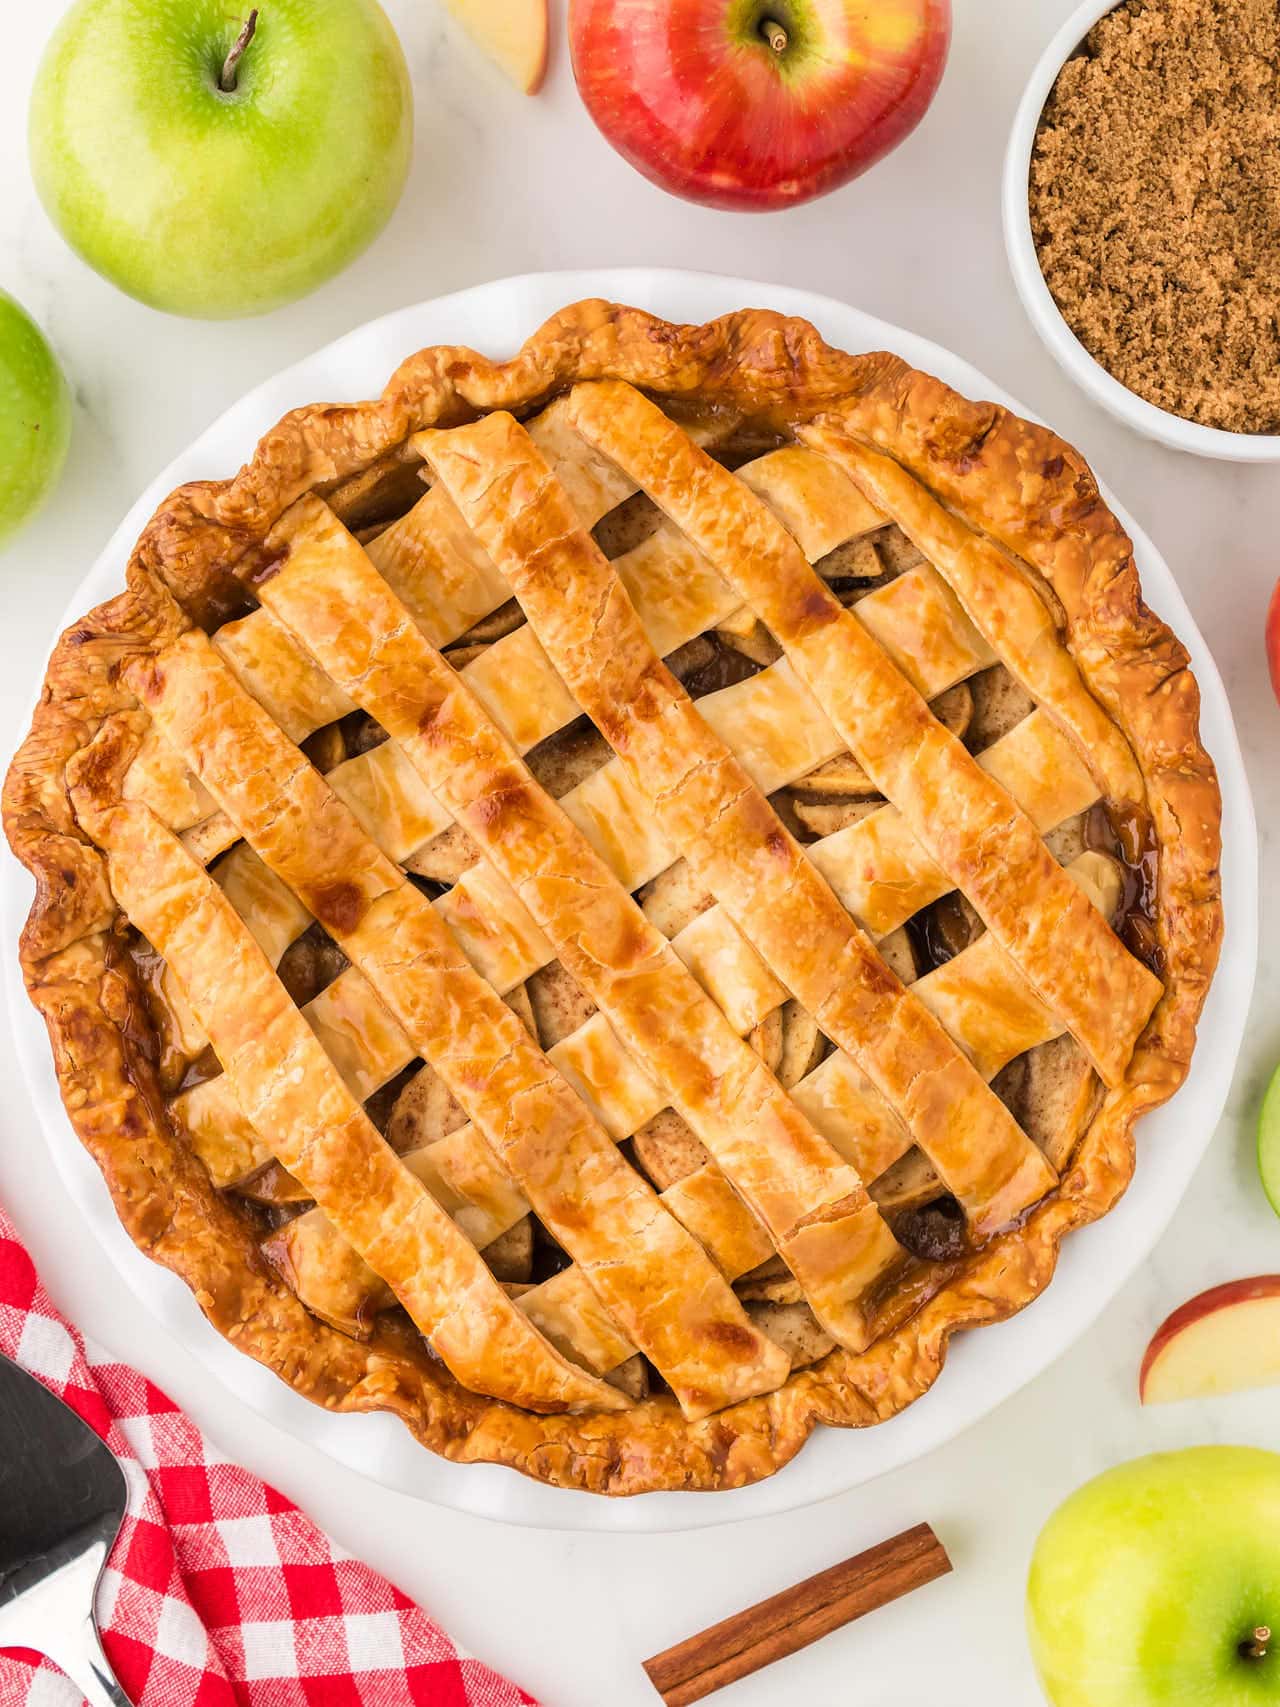
- Lattice top that’s easier than it looks and impressive every time
- Simple spice blend that enhances without overpowering the apples
- No soggy bottom thanks to the right flour ratio
- Feeds 8 people with generous slices
Ingredient Notes
Please check the recipe card below for a detailed, printable ingredient list.

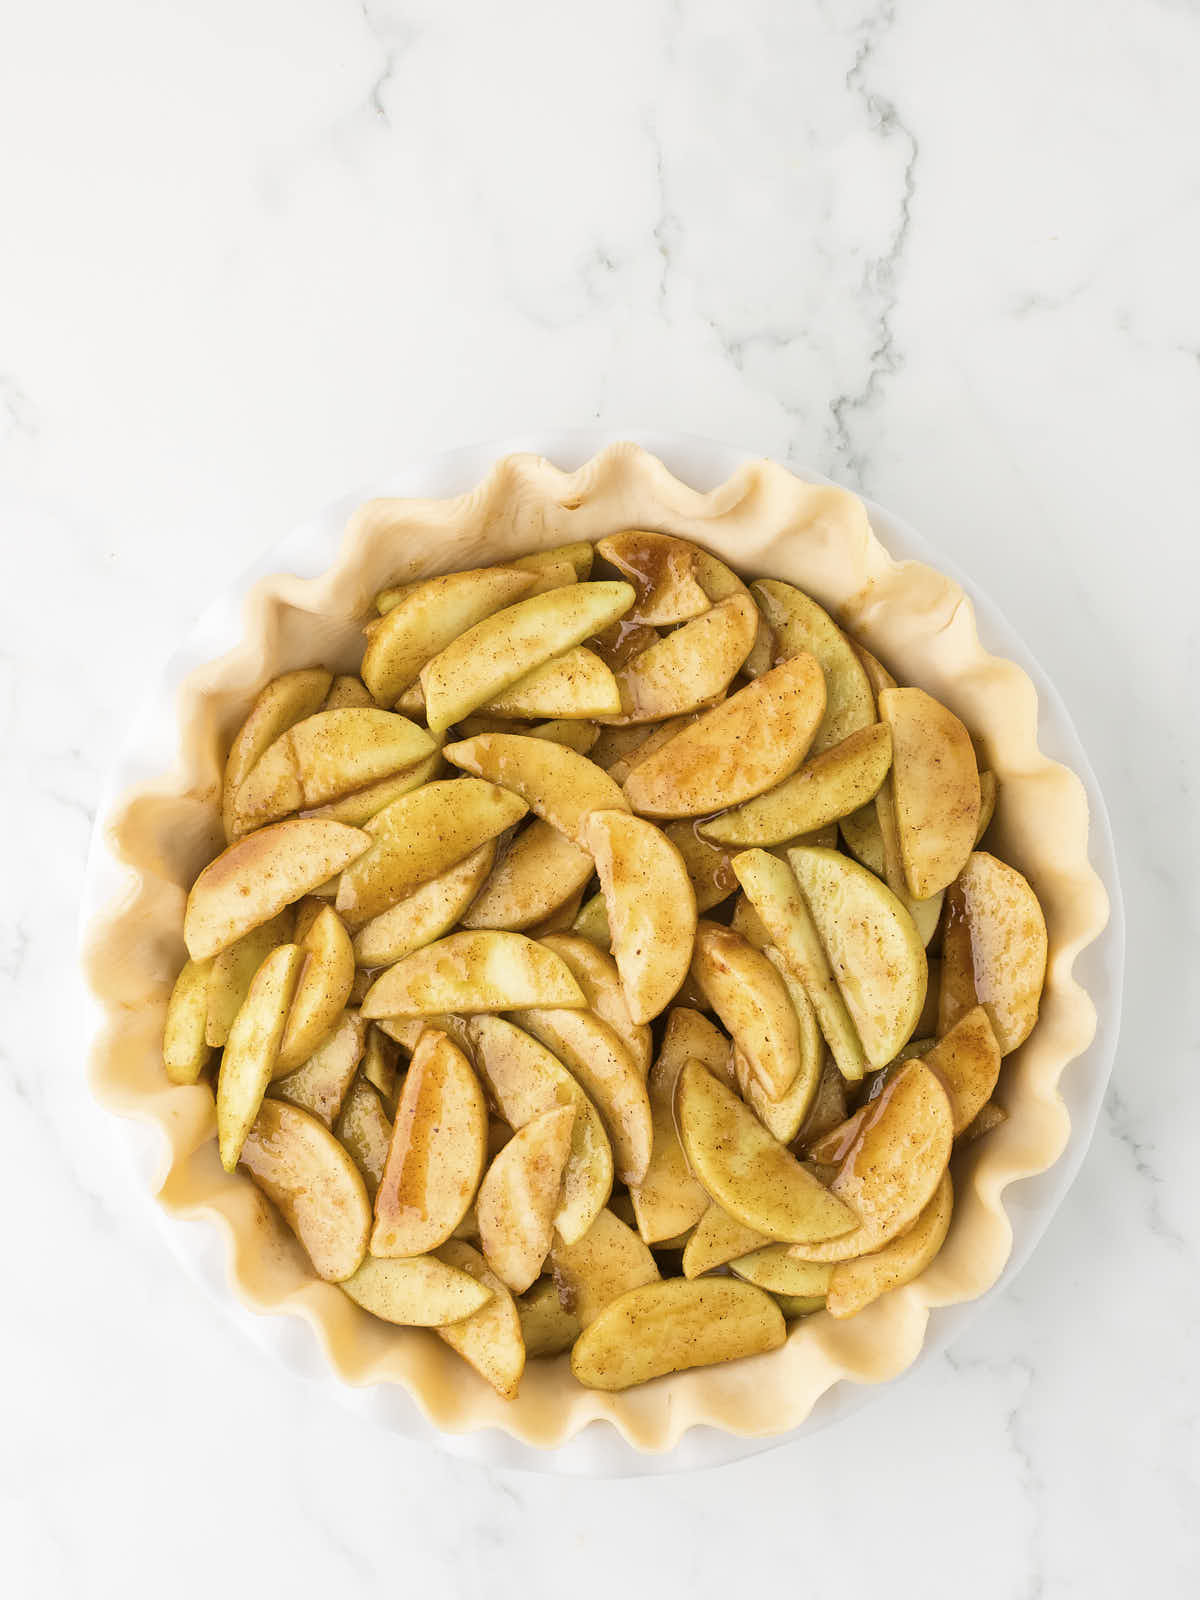
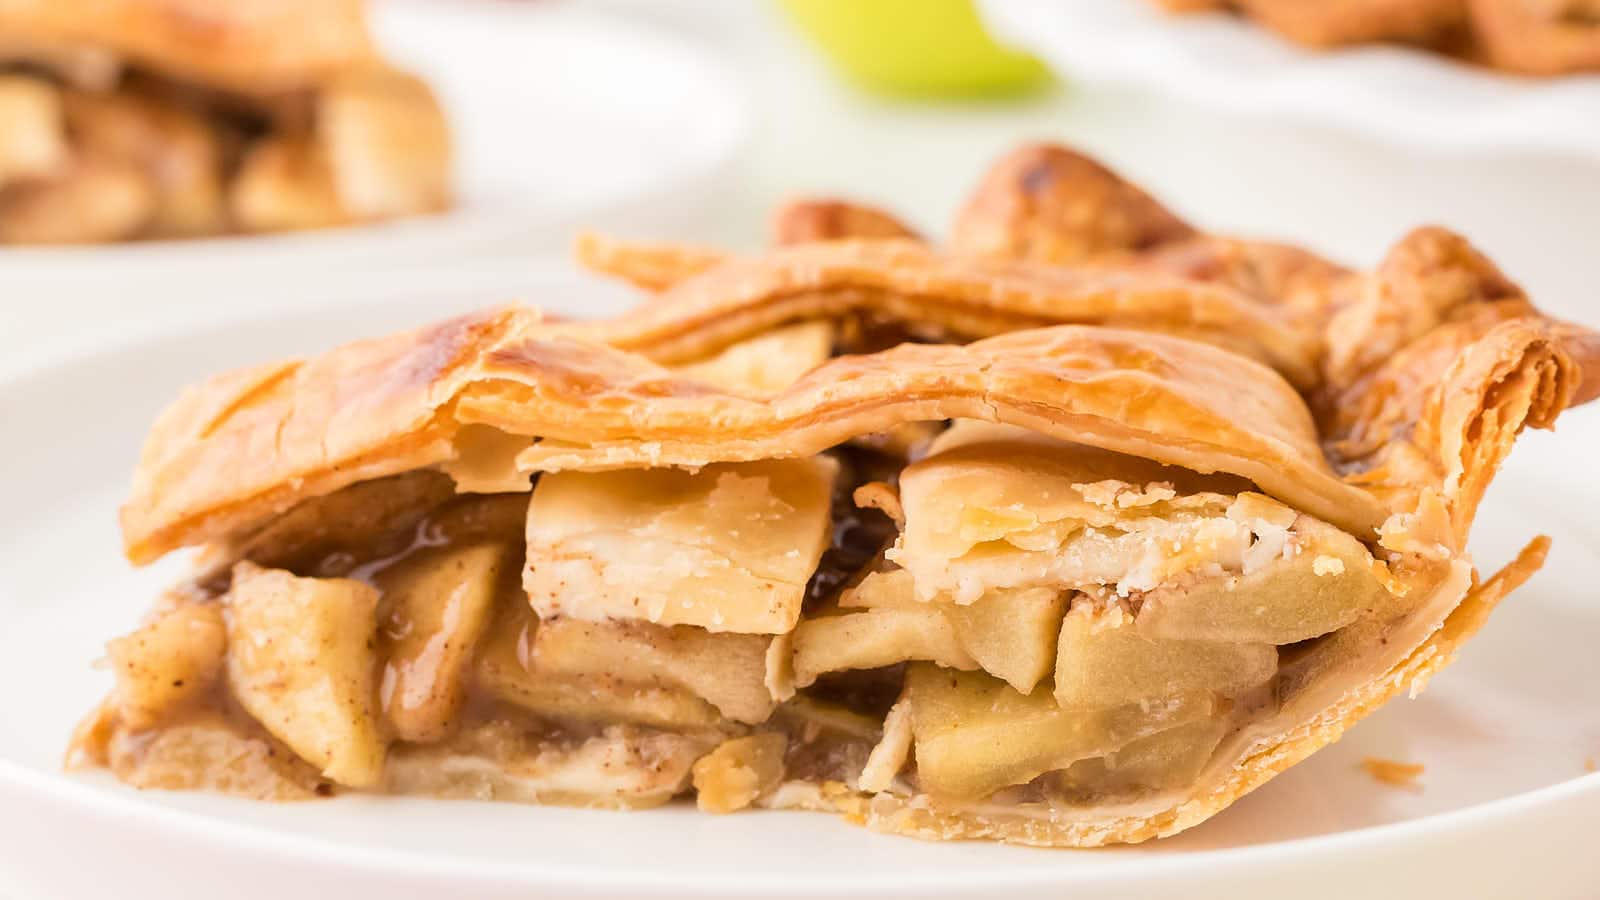
APPLES – The combination of Granny Smith and Honey Crisp apples is key to getting the right texture and flavor balance. Granny Smith apples hold their shape beautifully during baking and provide that essential tart contrast to the sweet filling, while Honey Crisp apples add natural sweetness and a tender bite. You want about 7 large apples total, and slice them thin so they cook evenly. Avoid Red Delicious or Gala apples since they break down too much and create a mushy filling.
BROWN SUGAR – Packed brown sugar adds deep molasses notes that complement the apples without overwhelming their natural flavor. The moisture in brown sugar also helps create that perfect syrupy filling consistency. Make sure to pack it firmly when measuring, and if it’s gotten hard in the bag, microwave it for 10 seconds with a damp paper towel to soften it up.
FLOUR – All-purpose flour acts as the thickener that prevents your pie from being soupy. Three tablespoons is exactly the right amount to absorb the apple juices without creating a gummy texture. Too little flour and you’ll have apple soup, too much and the filling becomes gluey. Mix it thoroughly with the apples so every slice gets coated.
CINNAMON – Ground cinnamon provides the warm spice backbone that makes apple pie taste like apple pie. Use fresh cinnamon if possible since the oils fade over time, and nearly two teaspoons gives you that perfect warm spice level without being overwhelming. The cinnamon also helps balance the tartness of the Granny Smith apples.
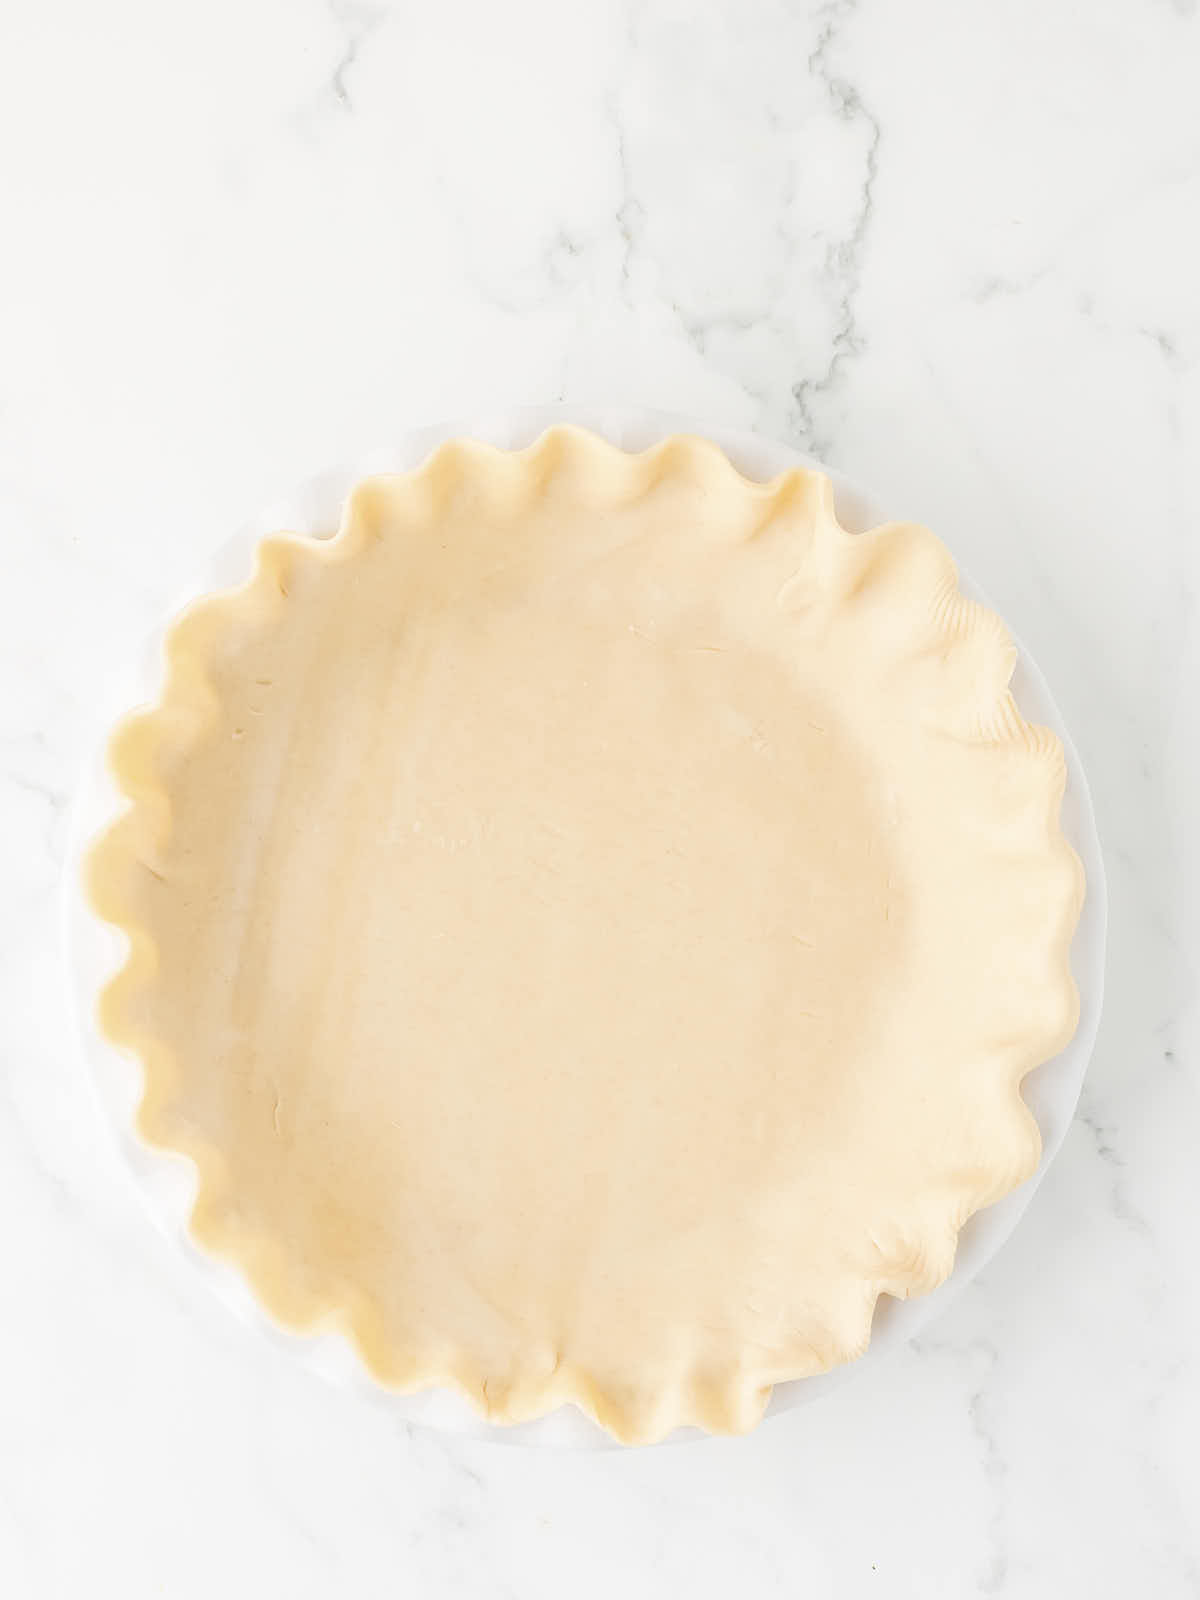
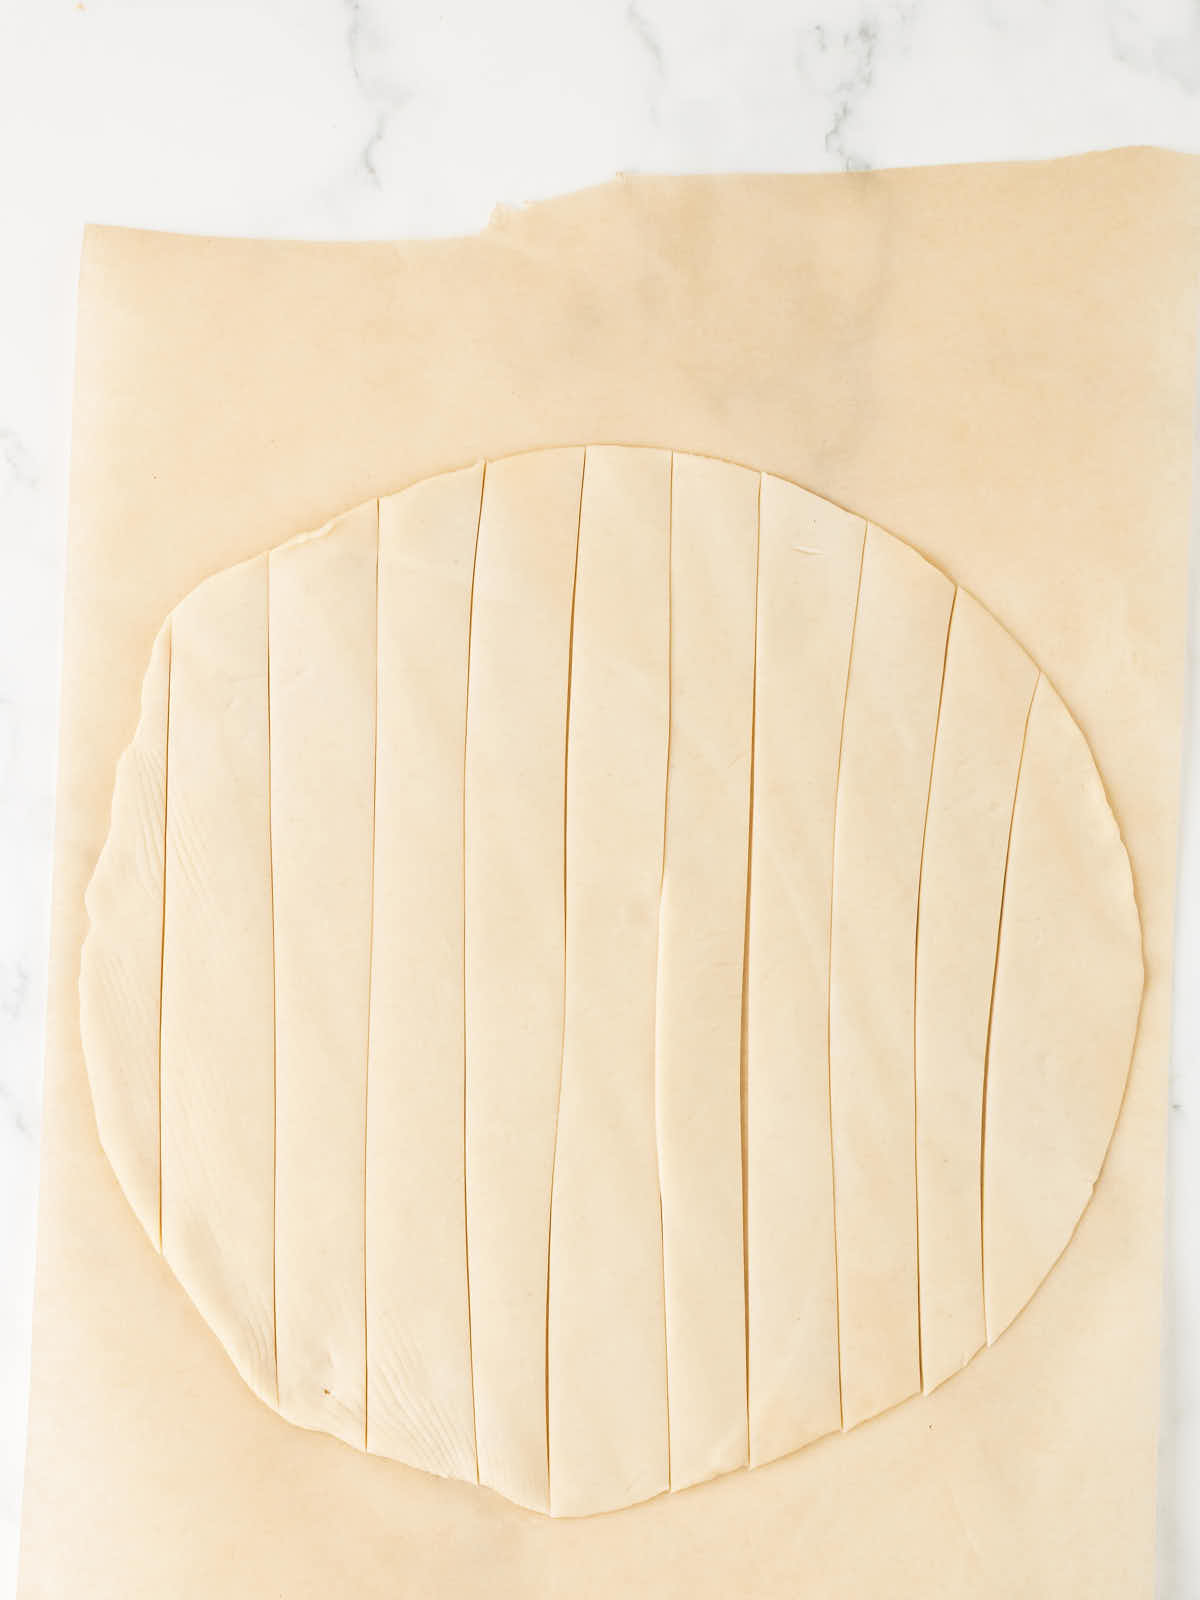
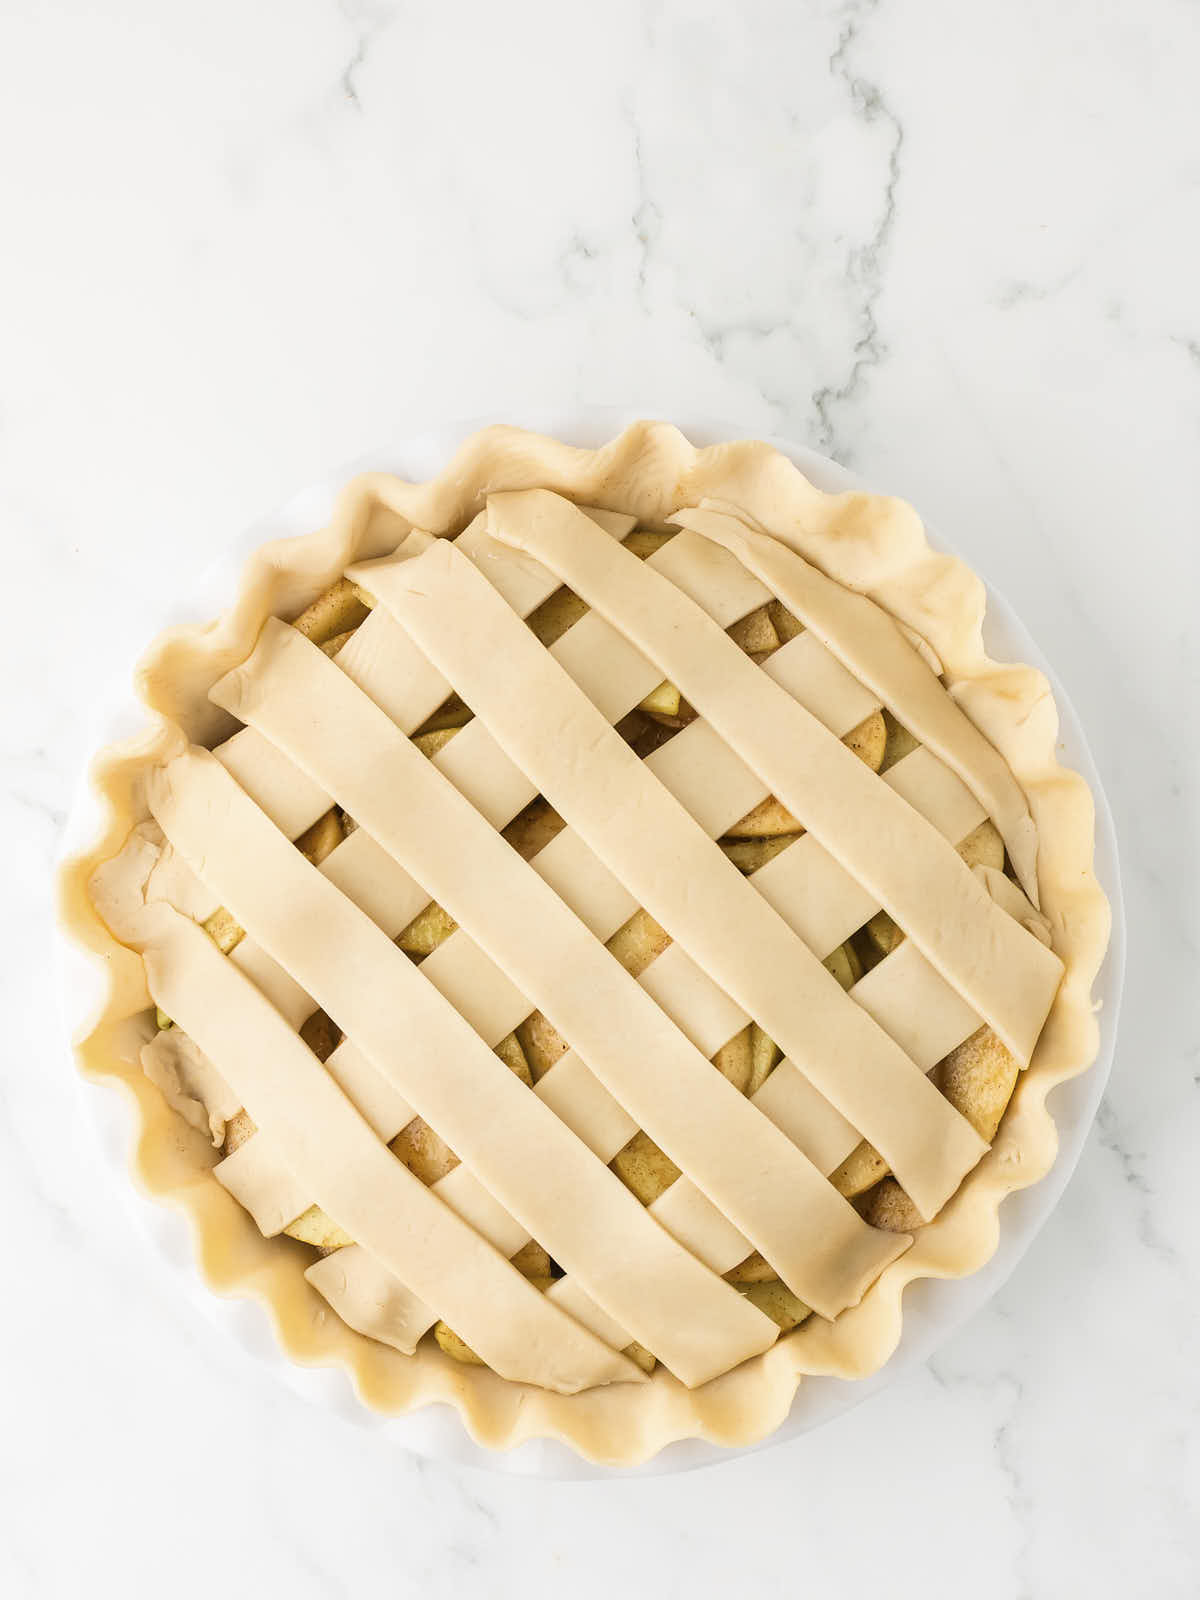
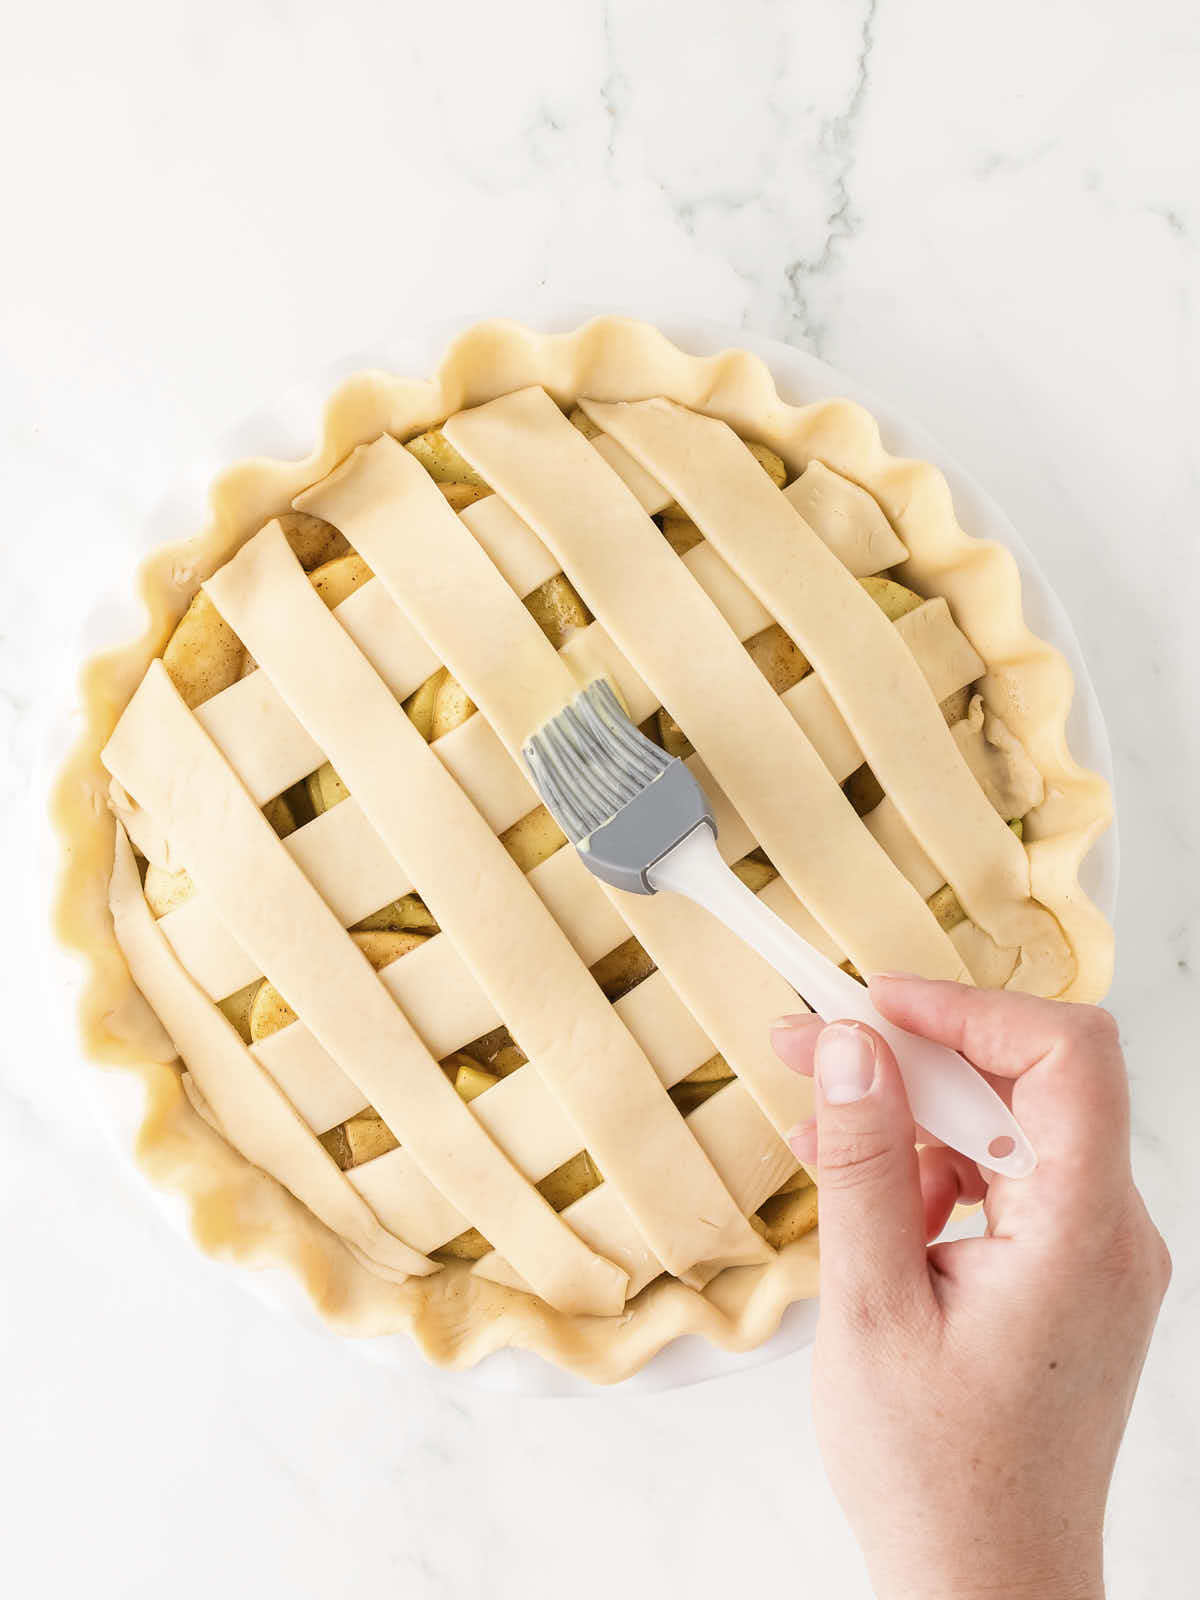
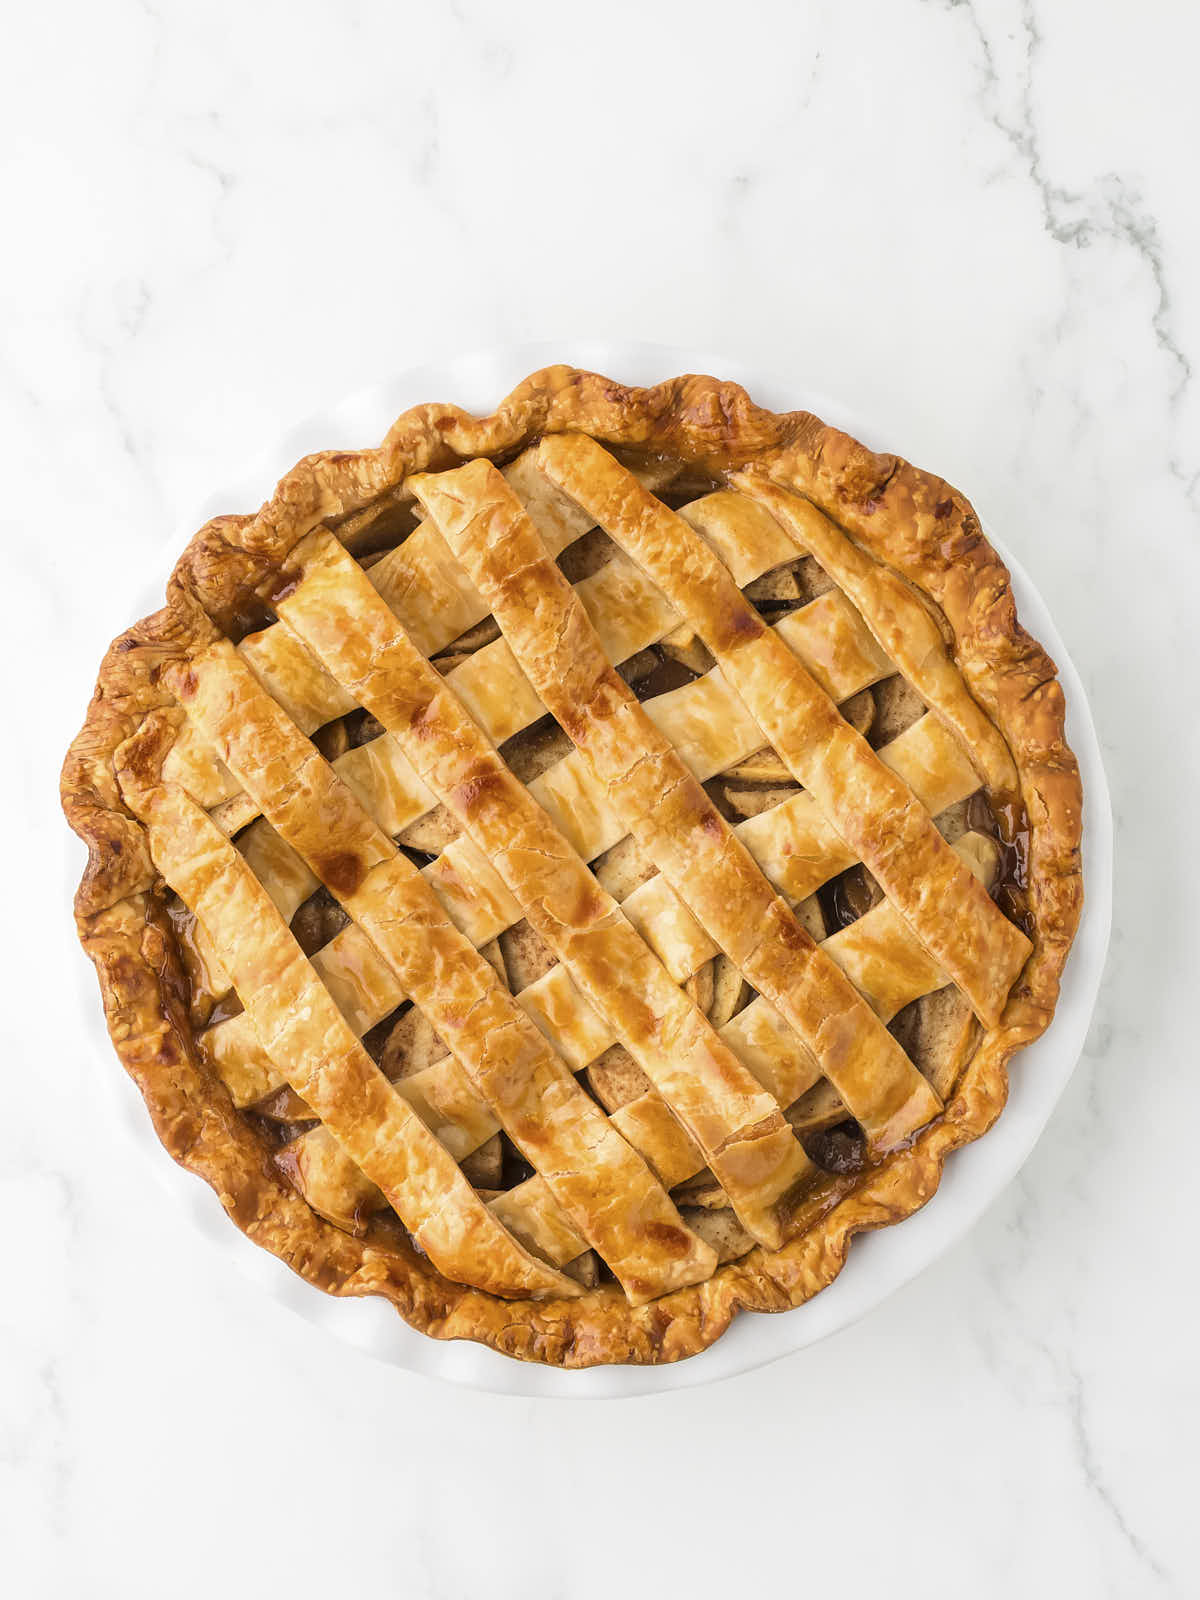
PIE CRUSTS – Two 9-inch refrigerated pie crusts save you time and deliver consistent results. Make sure they’re completely thawed before using, and if they crack while rolling, just press the pieces back together. The bottom crust needs to be pressed firmly into the pan to prevent shrinking, and the lattice top not only looks beautiful but allows steam to escape so your filling doesn’t get watery.
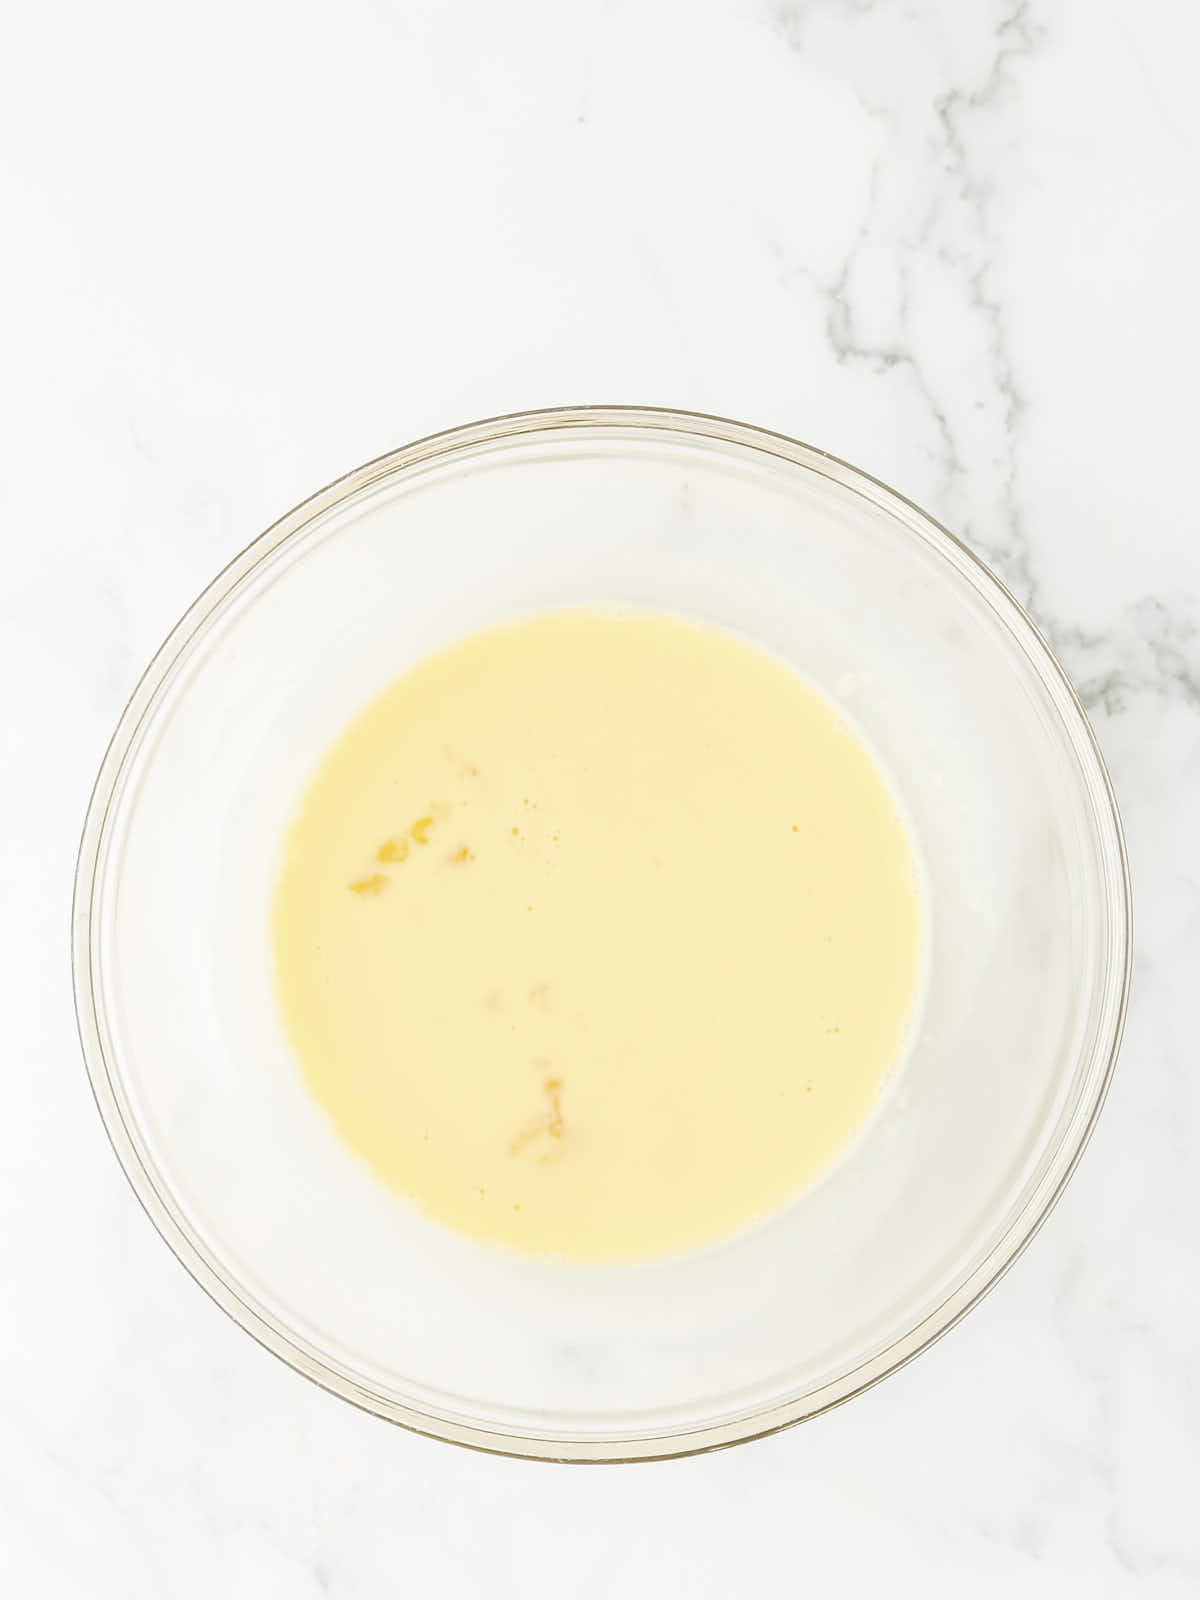
EGG WASH – The combination of egg and heavy cream creates that gorgeous golden brown finish on your lattice crust. The egg provides color and shine while the cream helps it brush on smoothly. This step makes the difference between a homemade-looking pie and a professional-looking one, so don’t skip it.
How To Make a Classic Apple Pie
Please check the printable recipe card below for more detailed instructions.

Leftovers and Storage
STORE – Keep your Apple Pie covered at room temperature for up to 2 days, or refrigerate in an airtight container for up to one week. The crust stays crispiest when stored at room temperature, but refrigeration is necessary for longer storage.
FREEZE – Wrap cooled pie tightly in plastic wrap, then aluminum foil, and freeze for up to 3 months. Thaw overnight in the refrigerator before serving.
REHEAT – Warm individual slices in a 350° Fahrenheit oven for 8 to 10 minutes to restore the crust’s crispness. Avoid microwaving whole slices since it makes the crust soggy.
MAKE AHEAD – Assemble the entire pie up to one day ahead, cover tightly with plastic wrap, and refrigerate. Add 5 to 10 extra minutes to the baking time when baking from cold.
More Easy Fall Desserts


Serving Suggestions
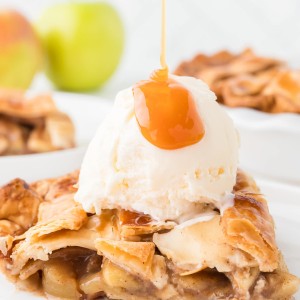
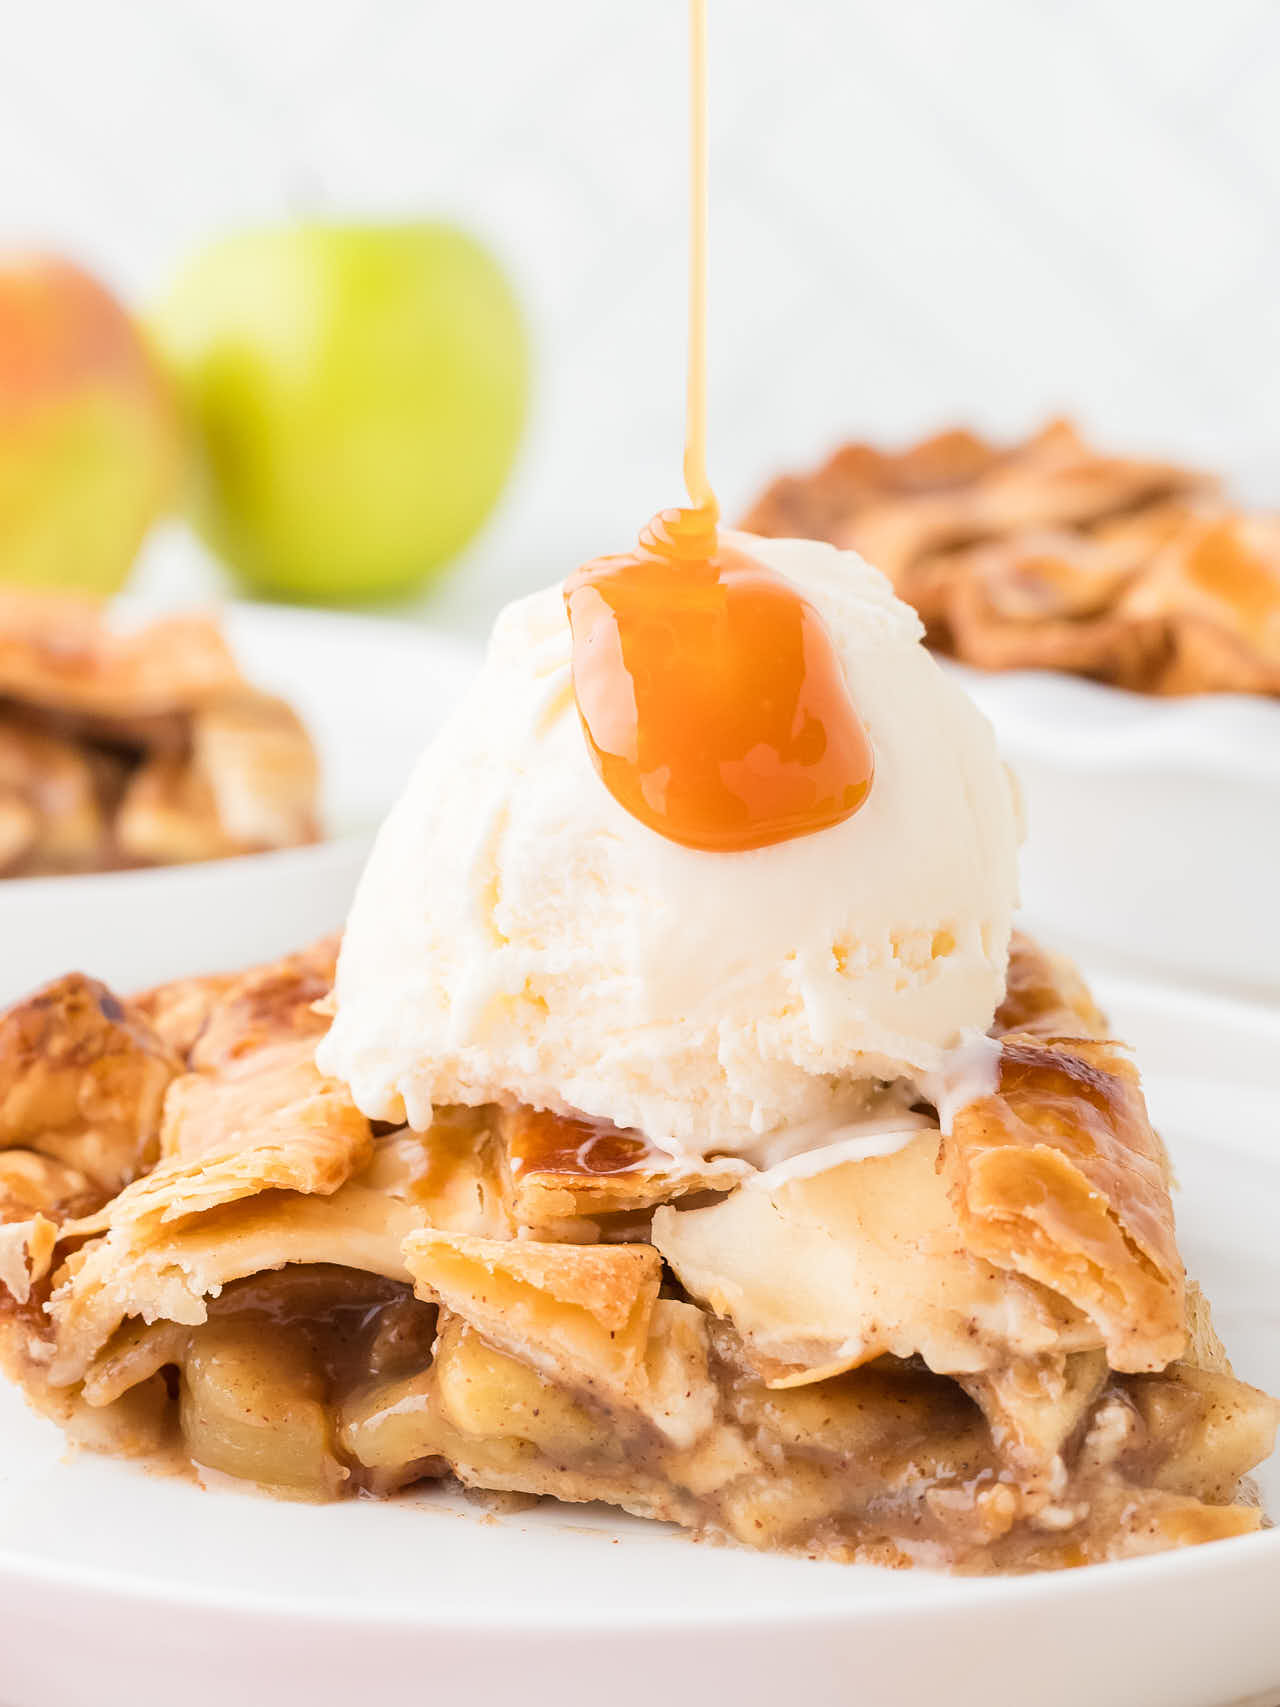
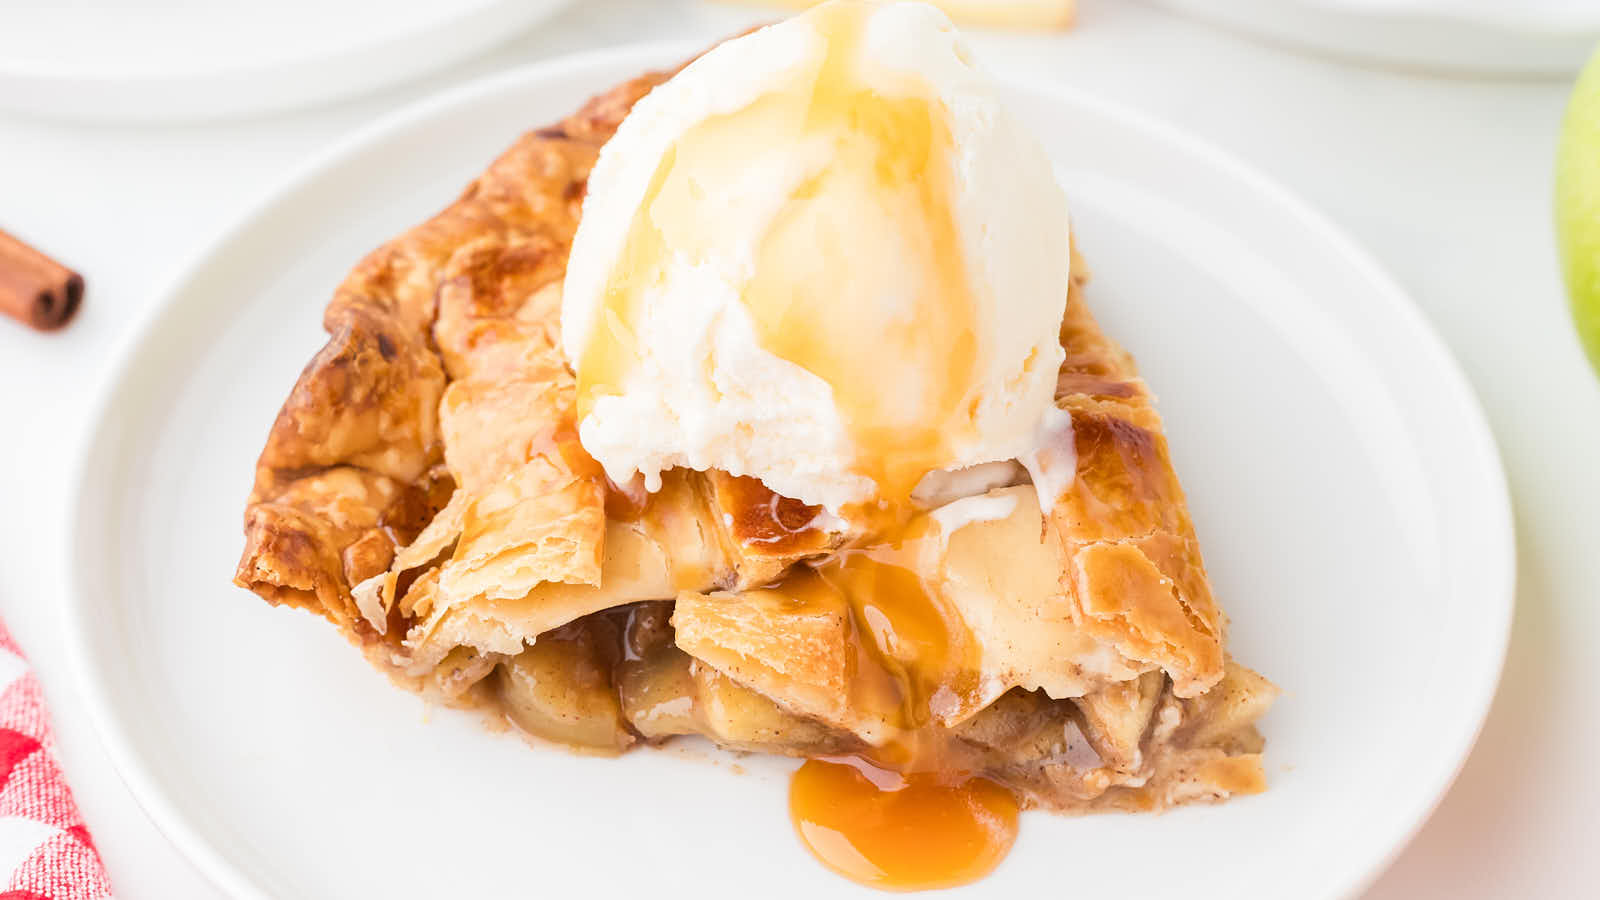
VANILLA ICE CREAM – The classic pairing that never disappoints. The cold, creamy vanilla provides the perfect temperature and flavor contrast to warm, spiced apples and creates those perfect melty moments.
SHARP CHEDDAR CHEESE – A traditional New England combination that might sound strange but works beautifully. The salty, sharp cheese balances the sweet fruit filling in an unexpected way that converts skeptics every time.
WHIPPED CREAM WITH CINNAMON – Lightly sweetened whipped cream with a pinch of cinnamon adds elegance without competing with the pie’s flavors. Perfect for holiday dinners when you want something a little more refined than ice cream.
CARAMEL SAUCE DRIZZLE – Warm caramel sauce amplifies the pie’s cozy fall flavors and adds an extra layer of indulgence. Heat store-bought sauce briefly to make it easier to drizzle.
MORNING COFFEE COMPANION – Apple pie for breakfast with strong black coffee is one of life’s simple pleasures, especially when served at room temperature with the filling perfectly set.
Recipe Success Tips
LATTICE WEAVING TECHNIQUE – Start with your longest strips and work from the center outward. Don’t worry about making it perfect since rustic looks charming, and if strips break, just press them back together or patch with extra dough.
PREVENT SOGGY BOTTOM – Make sure your bottom crust is pressed firmly against the pan with no air bubbles, and don’t skip the flour in the filling since it absorbs excess apple juices during baking.
EXPERT TIP – If your pie edges brown too quickly, cover them with aluminum foil or a pie shield after the first 25 minutes. You can also tent the entire pie with foil if the lattice gets too dark before the filling finishes cooking.
APPLE PREP SHORTCUT – Use an apple peeler-corer-slicer tool if you have one to speed up the prep work. Otherwise, cut apples into quarters, remove cores, then slice each quarter into thin pieces for even cooking.
DONENESS CHECK – Your Apple Pie is ready when the crust is deep golden brown and you can see the filling actively bubbling through the lattice openings. If the filling isn’t bubbling, it needs more time.

Commonly Asked Questions
Can I Use Different Types of Apples?
Yes, but stick with firm apples that hold their shape when baked. Good alternatives include Braeburn, Northern Spy, or Jonagold. Avoid soft apples like Red Delicious that turn mushy. I’ve just discovered Cosmic Crisp apples a few weeks ago and think they’ll be another great choice (I haven’t tested them yet).
Why Is My Apple Pie Filling Runny?
Usually this means the pie didn’t bake long enough or wasn’t cooled completely. The filling needs to bubble actively during baking and cool for 3 to 4 hours to set properly.
Can I Make This Pie Without a Lattice Top?
Absolutely. Use a full second crust and cut several slits for steam vents, or try a crumb topping instead. The lattice is beautiful but not essential for taste.
How Do I Prevent the Crust From Getting Too Brown?
Cover the edges with foil or a pie shield after 25 minutes, and tent the whole pie with foil if needed. Every oven bakes differently, so watch carefully during the last 15 minutes.
More Fall Desserts
Crockpot Apple Dump Cake – The easiest apple dessert ever with just a few ingredients that transform into warm, gooey perfection in your slow cooker.
German Apple Cake – Your authentic German Apfelkuchen recipe with tender apple slices nestled in a lightly sweet cake.
Apple Spice Dump Cake – All the cozy fall flavors of apple pie in an incredibly simple dump-and-bake format that delivers maximum comfort with minimum effort.
Apple Crisp – Classic crisp with a buttery oat topping that’s even easier than pie crust but delivers all those same warm apple and cinnamon flavors you crave.
Cast Iron Apple Crumb Cake – Rustic apple dessert recipe with a buttery crumb topping that bakes beautifully in your cast iron skillet.
Apple Turnovers – Flaky puff pastry pockets filled with spiced apples that deliver all the pie flavor in handheld form.
Apple Pie
Ingredients
- 4 large Granny Smith apples peeled, cored, and thinly sliced
- 3 large Honey Crisp apples peeled, cored, and thinly sliced
- ¾ cup brown sugar packed
- ¼ cup granulated sugar
- 3 tablespoons all-purpose flour
- 1 tablespoon lemon juice
- 1 teaspoon vanilla extract
- 1 ¾ teaspoons ground cinnamon
- ¼ teaspoon ground cloves
- ¼ teaspoon ground nutmeg
- 2 9-inch pie crust refrigerated or frozen and defrosted
For the egg wash
- 1 large egg
- 1 tablespoon heavy cream
Instructions
- Preheat the oven to 400° Fahrenheit and grease a 9-inch pie pan.
- In a large bowl, toss the apples with both sugars, flour, lemon juice, vanilla, cinnamon, cloves, and nutmeg until the apples are evenly coated. Set aside.
- Press one pie crust firmly into the bottom and sides of the prepared pan. Crimp or decorate the edges if desired.
- For a lattice top, place the second crust on a lightly floured surface or parchment. Cut into 1-inch strips.
- Stir the apples again, then pour them into the crust-lined pan and spread them into an even layer. Arrange one layer of strips over the top, spaced about 1 inch apart. Place a second layer of strips perpendicular to the first, weaving into a lattice pattern.
- In a small bowl, whisk the egg with the heavy cream. Brush the mixture evenly over the top crust.
- Bake the pie at 400° Fahrenheit for 25 minutes. Cover the edges with a pie shield or foil, reduce the oven temperature to 350° Fahrenheit, and continue baking for 35 to 40 minutes until the crust is golden brown and the filling is bubbling through the lattice.
- If using a shallow pie pan, place a baking sheet underneath to catch any drips.
- Cool the pie at room temperature for 3 to 4 hours until the filling is set before slicing and serving.
Notes
Nutritional Information
Nutritional Disclaimer
Cheerful Cook team members are not trained nutritionists or medical professionals. Calorie information and nutritional values are estimates. If you have nutritional concerns, we recommend using a nutritional calculator.
Maike Corbett grew up in German kitchens learning to cook and bake alongside her Omas before spending over a decade running full-service restaurants in the US. She founded Cheerful Cook in 2017 to share practical, tested comfort food recipes that actually work on busy weeknights, drawing on both her American restaurant experience and her German home-cooking roots. Her work has been featured on MSN, Yahoo, the Associated Press, and other major media outlets.